Migrate with AWS Database Migration Service (DMS)
This guide outlines the steps for using the AWS Database Migration Service (DMS) to migrate data to Neon from another hosted database server. AWS DMS supports a variety of database migration sources including PostgreSQL, MySQL, Oracle, and Microsoft SQL Server. For a complete list of data migration sources supported by AWS DMS, see Source endpoints for data migration.
For additional information about particular steps in the migration process, refer to the official AWS DMS documentation. If you are not familiar with AWS DMS, we recommend stepping through the Getting started with AWS Database Migration Service tutorial.
If you encounter problems with AWS DMS that are not related to defining Neon as a data migration target endpoint, please contact AWS Customer Support.
This guide uses the AWS DMS sample Postgres database for which the schema name is dms_sample.
Before you begin
Complete the following steps before you begin:
- Create a replication instance in AWS DMS.
- Configure a source database endpoint in AWS DMS.
- Set up a Neon project and a target database. See Create a project, and Create a database for instructions.
- If you are migrating from a database other than Postgres, use the Schema Conversion Tool or DMS Schema Conversion to convert and export the schema from the source database to the target database. Perform this step after creating the target endpoint for the Neon database but before the data migration. If migrating from a Postgres database, schema conversion is not required.
Create a target endpoint for your Neon database
-
In the AWS Console, select Database Migration Service.
-
Select Endpoints from the sidebar.
-
Click Create endpoint.
-
Select Target endpoint as the Endpoint type.
-
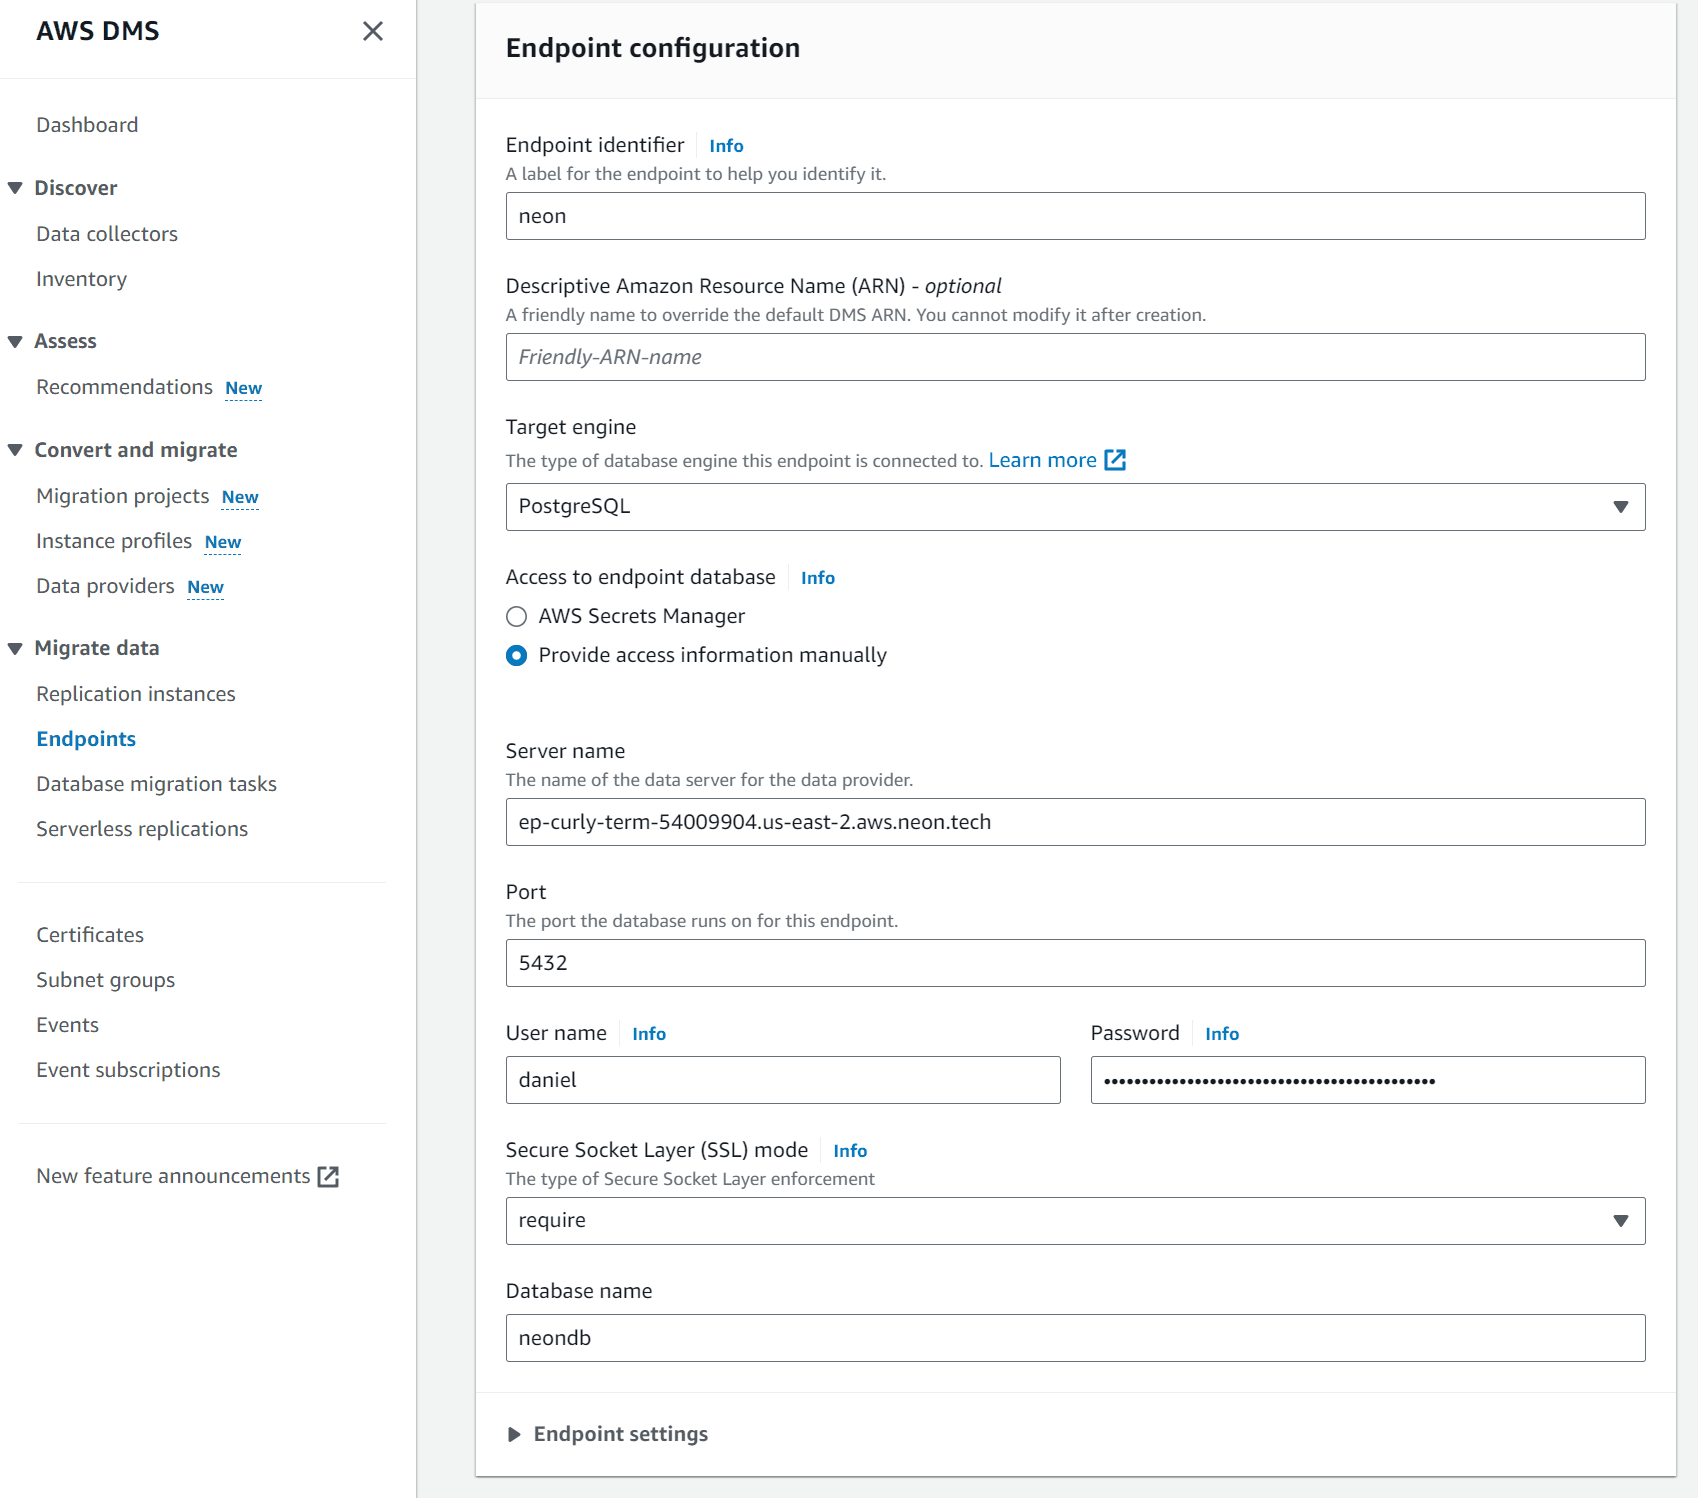
Provide an Endpoint identifier label for your new target endpoint. In this guide, we use
neonas the identifier. -
In the Target engine drop-down menu, select
PostgreSQL. -
Under Access to endpoint database, select Provide access information manually and enter the information outlined below. You can obtain the connection details from your Neon connection string, which you can find in the Connection Details widget on the Neon Dashboard. Your connection string will look similar to this:
postgresql://daniel:AbC123dEf@ep-curly-term-54009904.us-east-2.aws.neon.tech/neondb".-
Server name: Specify your Neon hostname, which is this portion of your connection string:
ep-curly-term-54009904.us-east-2.aws.neon.tech -
Port:
5432 -
User name: Specify the Neon user.
-
Password: Specify the password in the following format:
endpoint=[endpoint_id]$[password], which looks similar to this when defined:endpoint=ep-curly-term-54009904$AbC123dEfYou can obtain the
endpoint_idand password from your Neon connection string. Theendpoint_idappears similar to this:ep-curly-term-54009904. For information about why this password format is required, see Connection errors. AWS DMS requires the Option D workaround. -
Secure Sockets Layer (SSL) mode: Select
require. -
Database name: The name of your Neon database. In this example, we use a database named
neondbWhen finished, your target endpoint configuration should look similar to this:
-
-
Under Test endpoint connection (optional), click Run test to test the connection. Running the test creates the endpoint and attempts to connect to it. If the connection fails, you can edit the endpoint definition and test the connection again.
-
Select Create endpoint.
Create a database migration task
A database migration task defines the data to be migrated from the source database to the target database.
- In AWS DMS, select Database migration tasks from the sidebar.
- Select Create task to open a Create database migration task page.
- Enter a Task identifier to identify the replication task. In this example, we name the identifier
dms-task. - Select the Replication instance. In this guide, the replication instance is named
dms_instance. - Select the Source database endpoint. In this guide, the replication instance is named
dms_postgresql. - Select the Target database endpoint. In this guide, the target database endpoint identifier is
neon. - Select a Migration type. In this example, we use the default
Migrate existing datatype.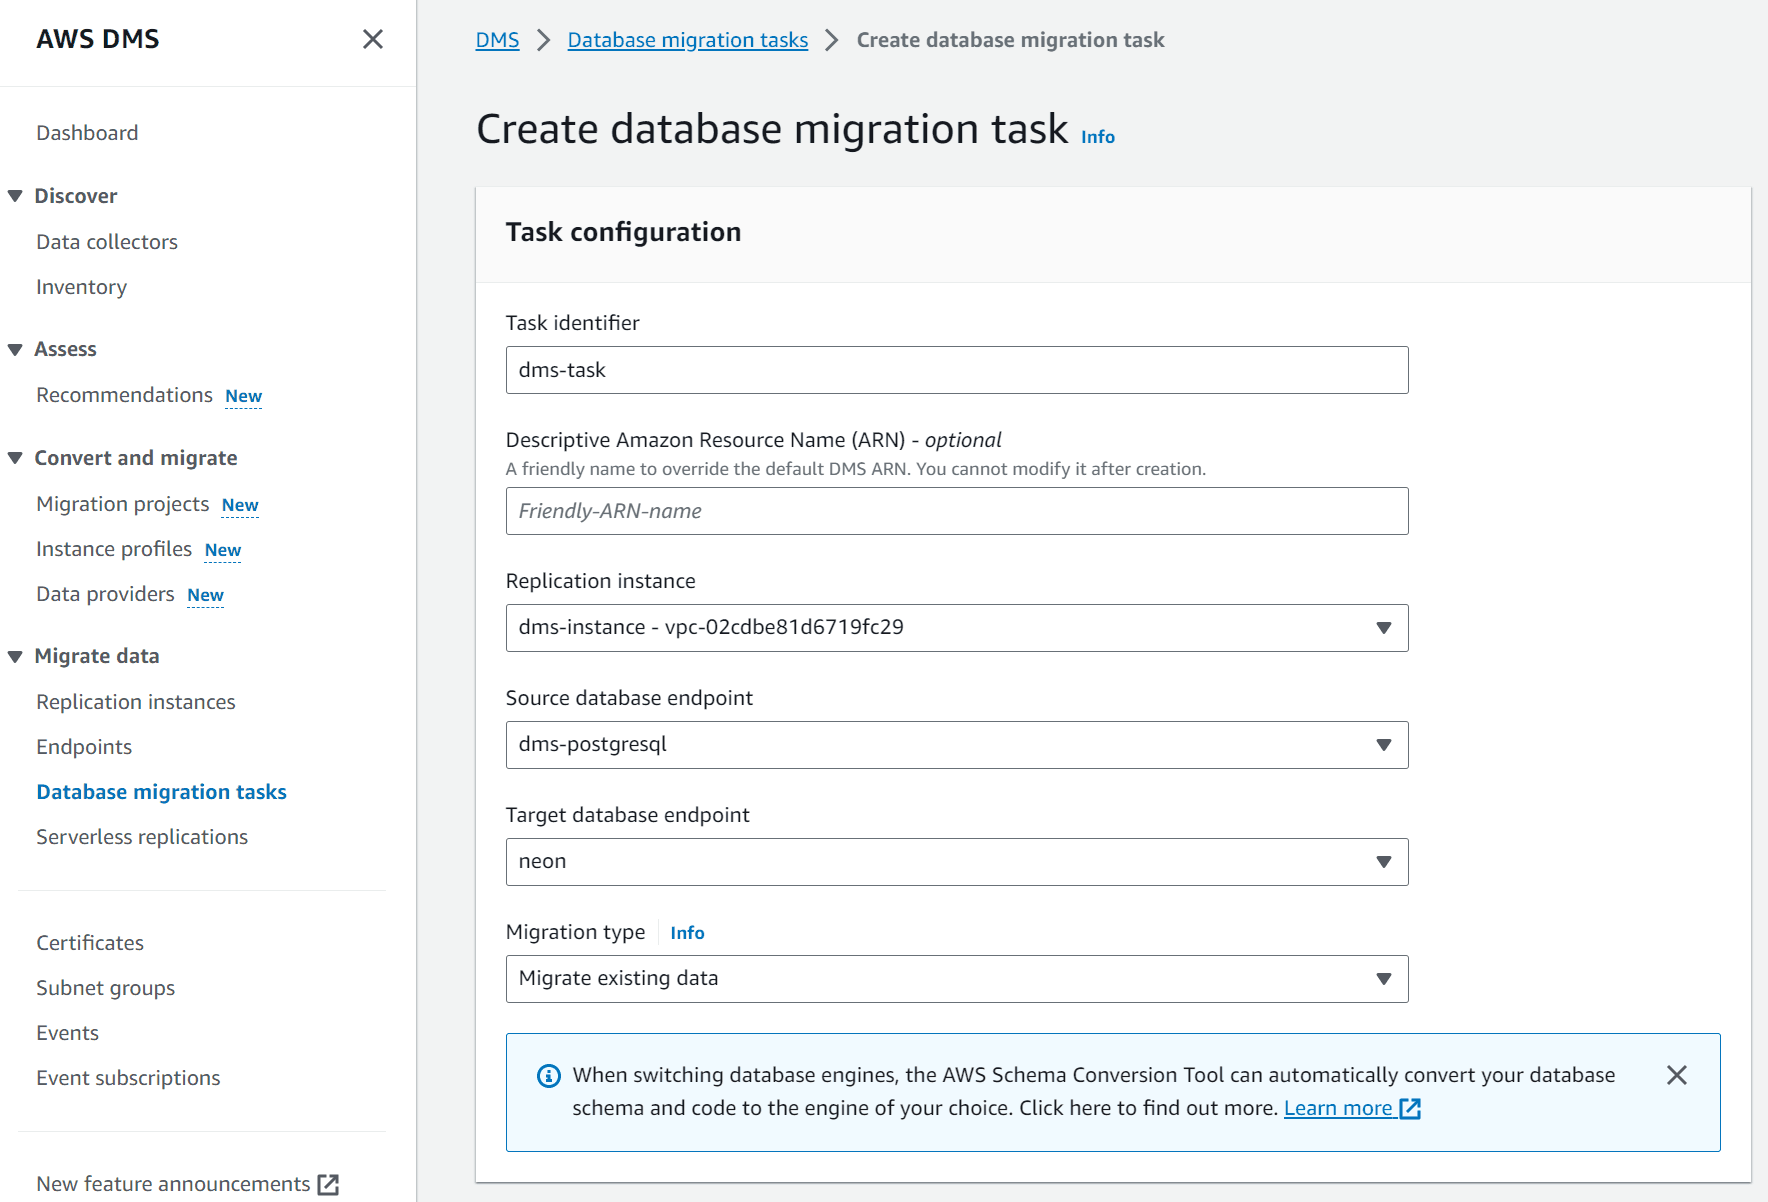
Task settings
Specify the following task settings:
- For Editing mode, select Wizard.
- For Target table preparation mode, select Do nothing. This option means that AWS DMS only creates tables in the target database if they do not exist.
- For the LOB column setting, select Don't include LOB columns. Neon does not support LOB columns.
- Optionally, under Validation, check Turn on to compare the data after the load operation finishes to ensure that data was migrated accurately. For more information about validation, refer to the AWS data validation documentation.
You can also check Enable CloudWatch logs and set Target Load to Debug or Detailed debug to log information during the migration process. This data is useful for troubleshooting migration issues.
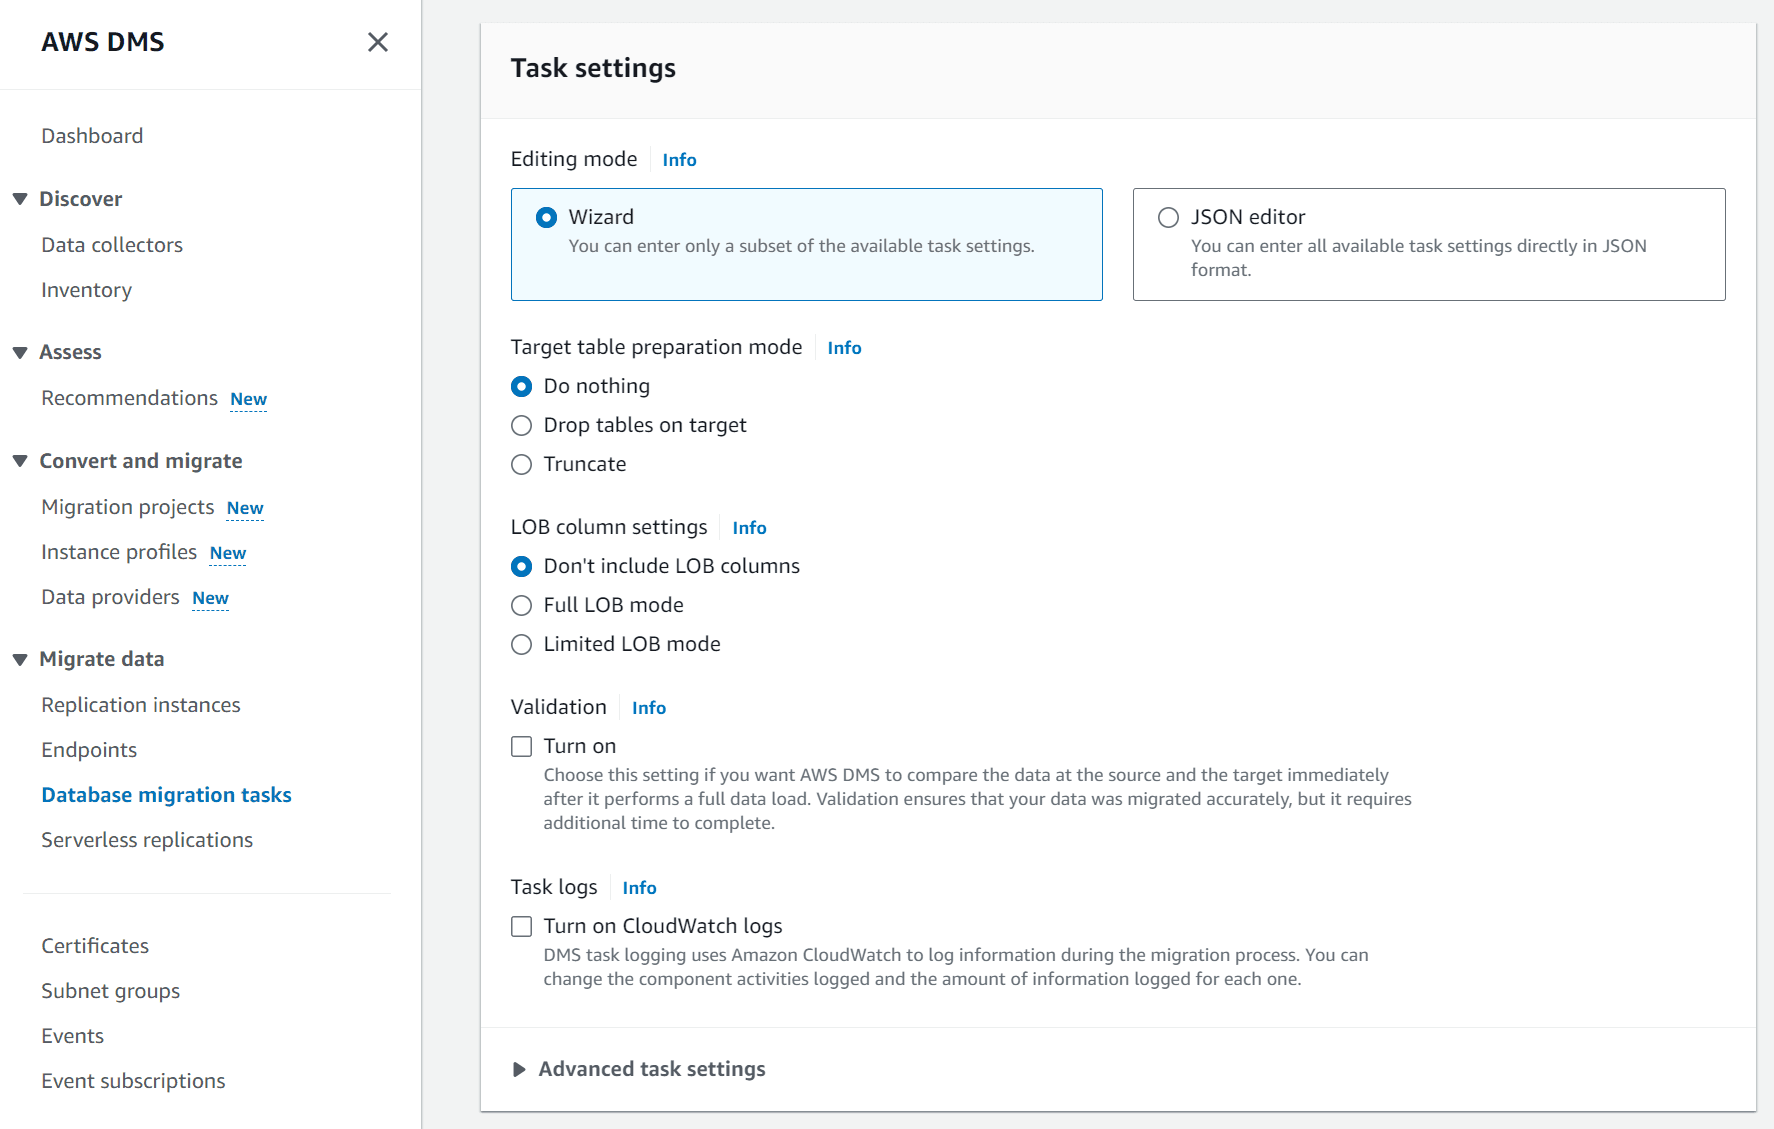
Table mappings
Configure the table mapping:
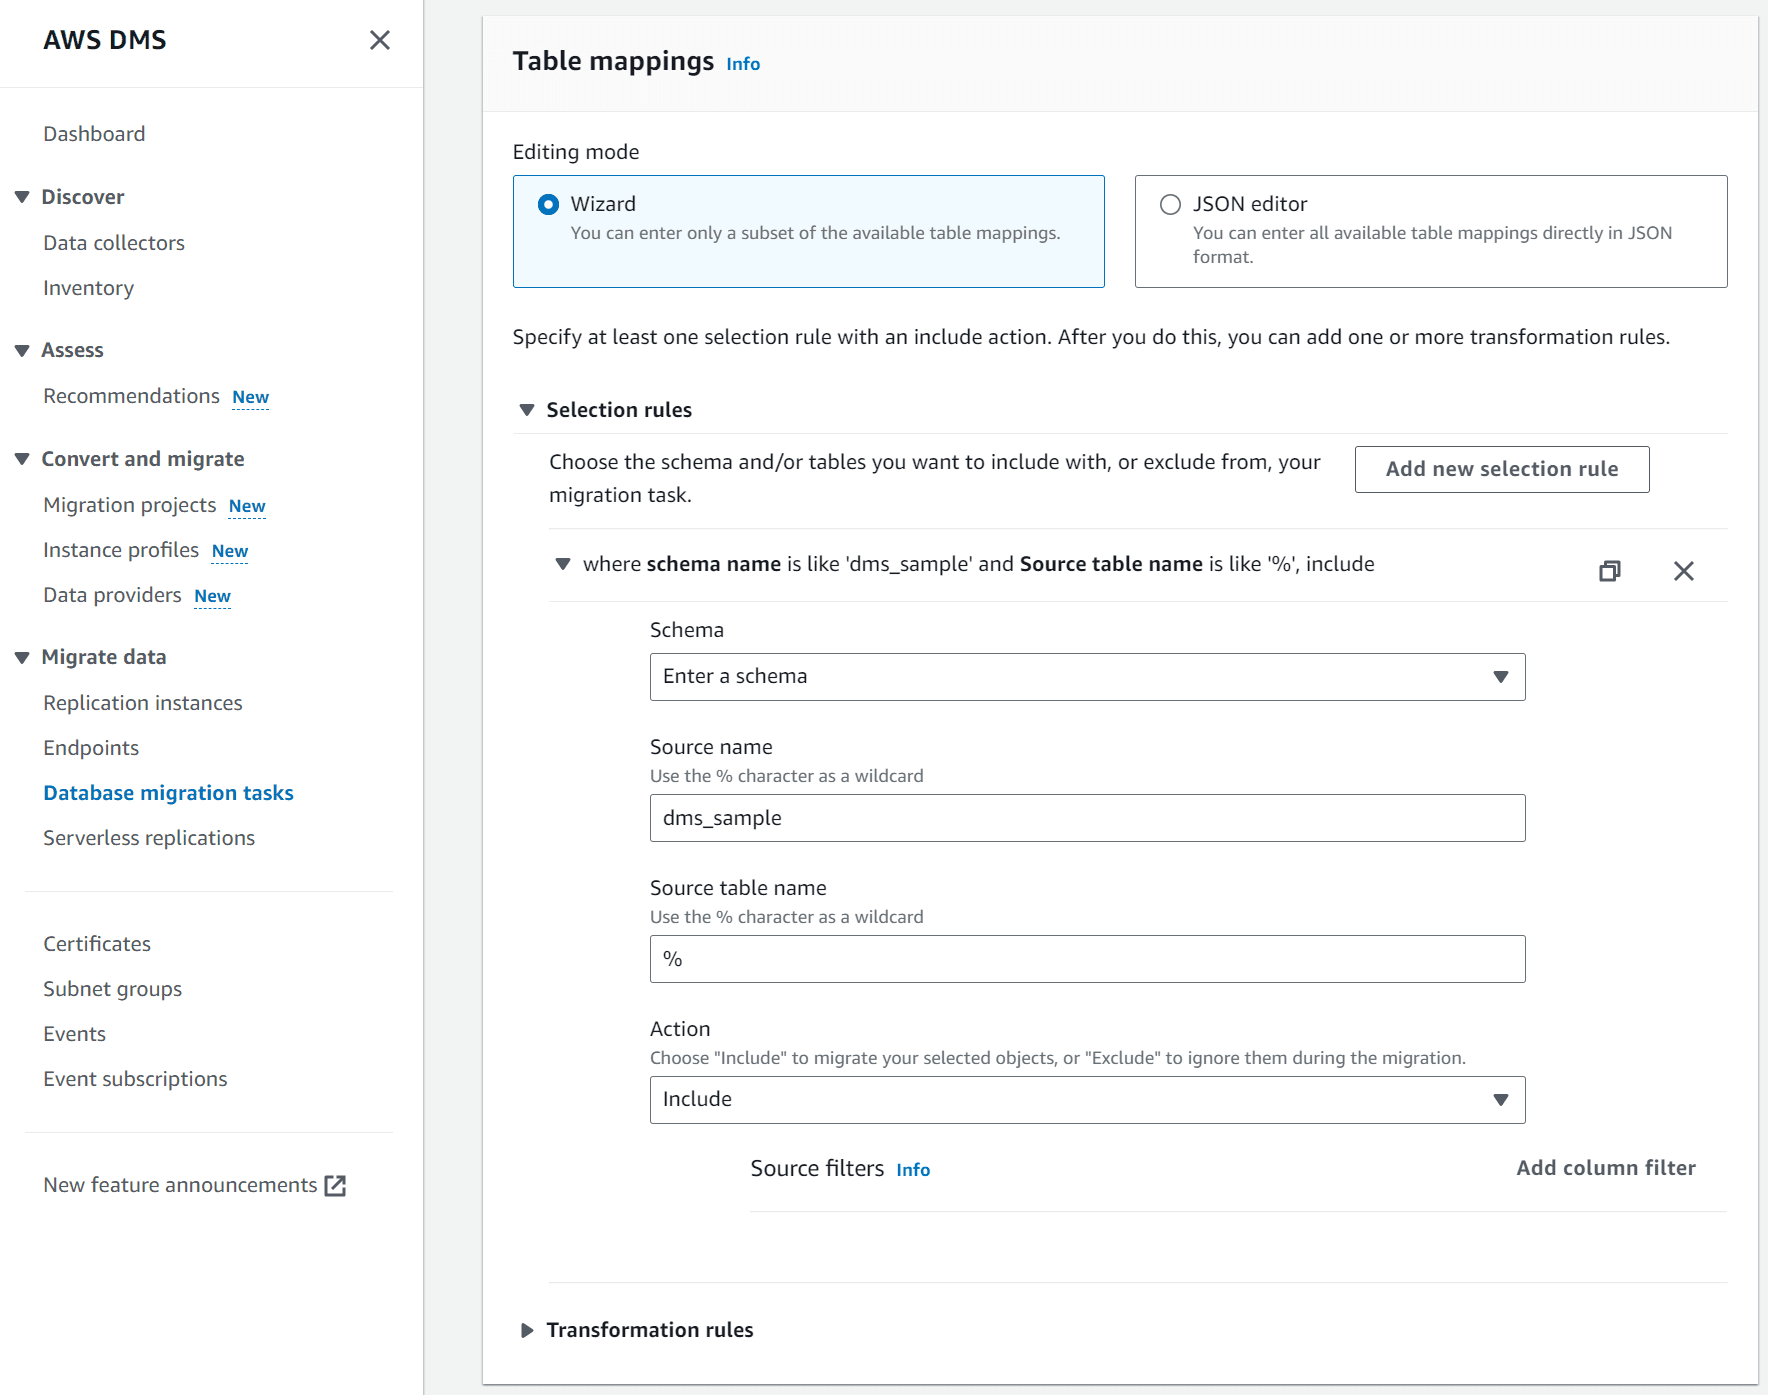
- For Editing mode, select Wizard.
- Under Selection rules, click Add new selection rule.
- For Schema, select Enter a schema.
- For Source name, enter the name of your database schema. In this guide,
dms_sampleis specified as the schema name, which is the schema for the sample database. Thedms_sampleschema will be created in your Neon database, and all database objects will be created in the schema. - For the Source table name, leave the
%wildcard character to load all tables in the schema. - For Action, select Include to migrate the objects specified by your selection rule.
Migration task startup configuration
- Under *Migration task startup configuration, select Automatically on create.
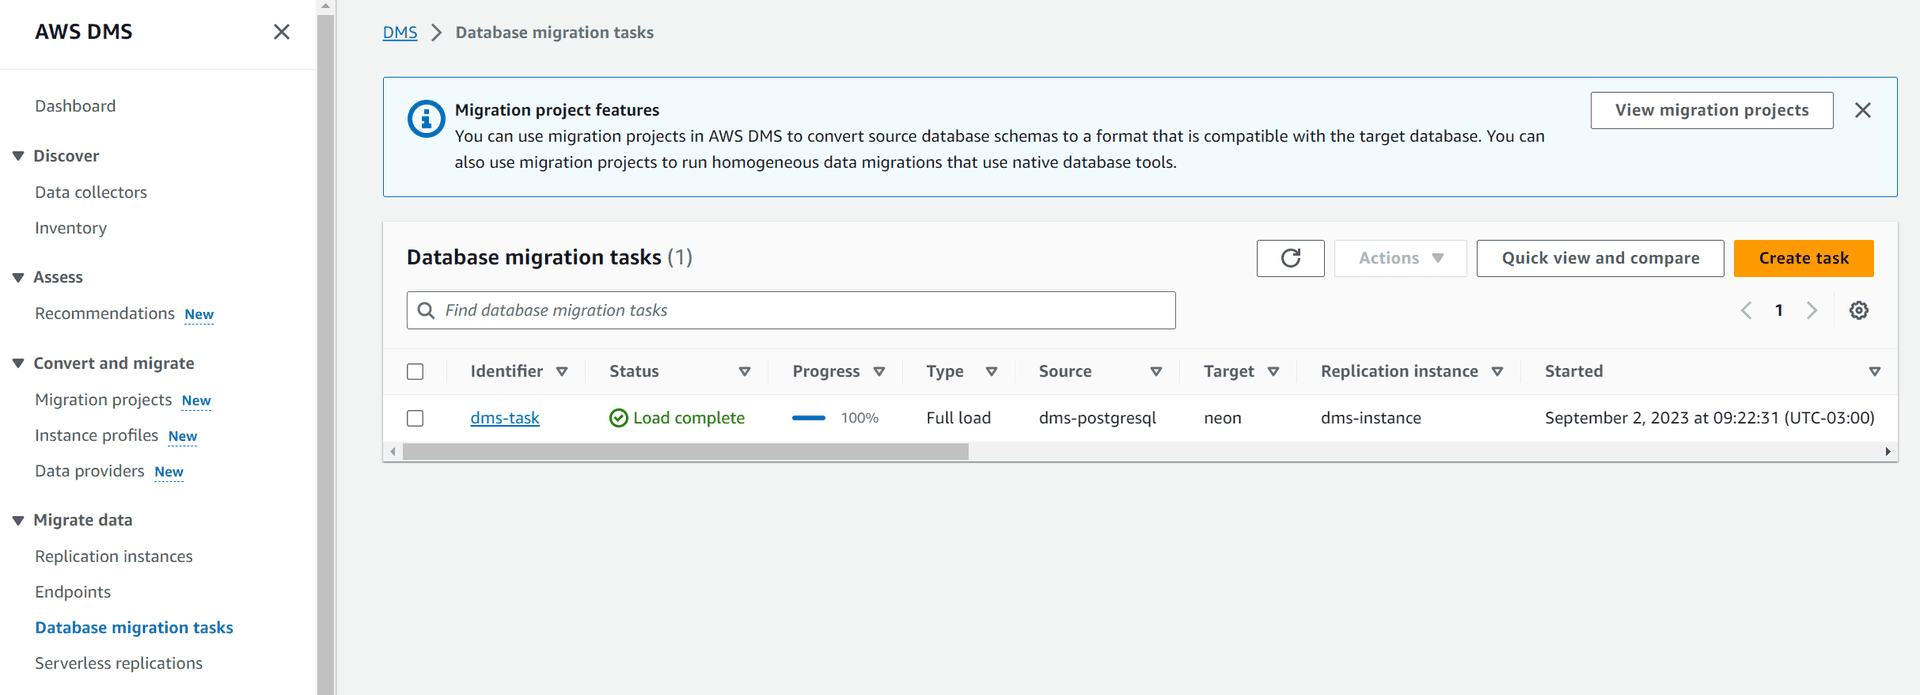
- Click Start migration task at the bottom of the page. The data migration task is created, and the data migration operation is initiated. You can monitor operation progress on the AWS DMS Database migrations tasks page.
Verify the migration in Neon
To verify that data was migrated to your Neon database:
- In the Neon Console, select your Neon project.
- Select Tables from the side bar.
- Select the Branch, Database, and Schema where you imported the data.
 .
.
Migration notes
This section contains notes from our experience using AWS DMS to migrate data to Neon from an RDS Postgres database.
-
When testing migration steps, the Getting started with AWS Database Migration Service tutorial was our primary reference. As recommended in the tutorial, we created a VPC and created all resources within the VPC.
-
We created all resources in the same region (
us-east-2a) -
We created an RDS PostgreSQL 15 database called
dms_sampleas the source database. The Neon target database was also Postgres 15. -
We populated the RDS PostgreSQL source database using the AWS DMS sample Postgres database. To do this, we created an EC2 instance to connect to the database following the steps in this topic: Create an Amazon EC2 Client.
-
The source database was populated using this
psqlcommand:psql -h dms-postgresql.abc123def456hgi.us-east-2.rds.amazonaws.com -p 5432 -U postgres -d dms_sample -a -f ~/aws-database-migration-samples/PostgreSQL/sampledb/v1/postgresql.sql -
To verify that data was loaded in the source database, we connected using the following
psqlcommand and ran aSELECTquery:psql \ --host=dms-postgresql.abc123def456hgi.us-east-2.rds.amazonaws.com \ --port=5432 \ --username=postgres \ --password \ --dbname=dms_sample dms_sample=> SELECT * from dms_sample.player LIMIT 100; -
When creating the source database endpoint for the RDS Postgres 15 database, we set Secure Socket Layer (SSL) mode to
require. Without this setting, we encountered the following error:Test Endpoint failed: Application-Status: 1020912, Application-Message: Failed to connect Network error has occurred, Application-Detailed-Message: RetCode: SQL_ERROR SqlState: 08001 NativeError: 101 Message: FATAL: no pg_hba.conf entry for host "10.0.1.135", user "postgres", database "dms_sample", no encryption -
When creating the target database endpoint for the Neon database, we encountered the following error when testing the connection:
Endpoint failed: Application-Status: 1020912, Application-Message: Cannot connect to ODBC provider Network error has occurred, Application-Detailed-Message: RetCode: SQL_ERROR SqlState: 08001 NativeError: 101 Message: timeout expiredThe replication instance, which was created in the private subnet where the source database resided, could not access the Neon database, which resides outside of the VPC. To allow the replication instance to access the Neon database, we added a NAT Gateway to the public subnet, allocated an Elastic IP address, and modified the Route Table associated with the private subnet to add a route via the NAT Gateway.